Grout is easy to ignore until the day it starts cracking, going mouldy, or falling out in chunks. At that point, the damage has usually been building for a while. A small gap in the grout line is not just a cosmetic problem. It is an open door for water to travel behind your tiles, into the walls, and eventually into the subfloor. In Australian homes, where showers get heavy daily use, and bathrooms can hold humidity for hours, deteriorating grout is one of the most common maintenance issues homeowners face.
This guide covers everything you need to know about shower grout repair, from identifying the type of damage to the full process of removing old grout, applying new material, and sealing the joints correctly. Whether you want to handle the job yourself or understand what to expect from a professional, every step is explained plainly so you can make a confident decision.

Grout is the material that fills the joints between tiles. In a shower, it plays two roles: it holds tiles together as a rigid system, and it creates a sealed barrier that stops water from getting behind the tiled surface. Most shower grout is cement-based, though epoxy grout is increasingly common in modern bathrooms because of its superior resistance to moisture and staining.
The reason grout fails is straightforward. It is a porous material sitting in the most water-exposed zone in a home. Every time someone uses the shower, water comes into contact with the grout lines. Heat from hot water causes slight expansion; cooling causes contraction. Over months and years, this cycle weakens the material. Add mould, cleaning chemicals, poor original installation, and normal house movement, and grout deterioration is almost inevitable without proper sealing and maintenance. Understanding this gives you an important starting point. Grout repair is not just cosmetic work. It is structural maintenance for your shower.
Before reaching for tools or calling a professional, take five minutes to inspect your shower carefully. Not all grout issues are equal, and knowing what you are looking at helps you decide how urgent the repair is and what approach to take.
Condition | What It Means | Urgency |
Hairline cracks | Early-stage wear | Moderate |
Missing grout sections | Active water ingress risk | High |
Soft or crumbling grout | Structural breakdown | High |
Surface staining only | Cosmetic or early mould | Low to Moderate |
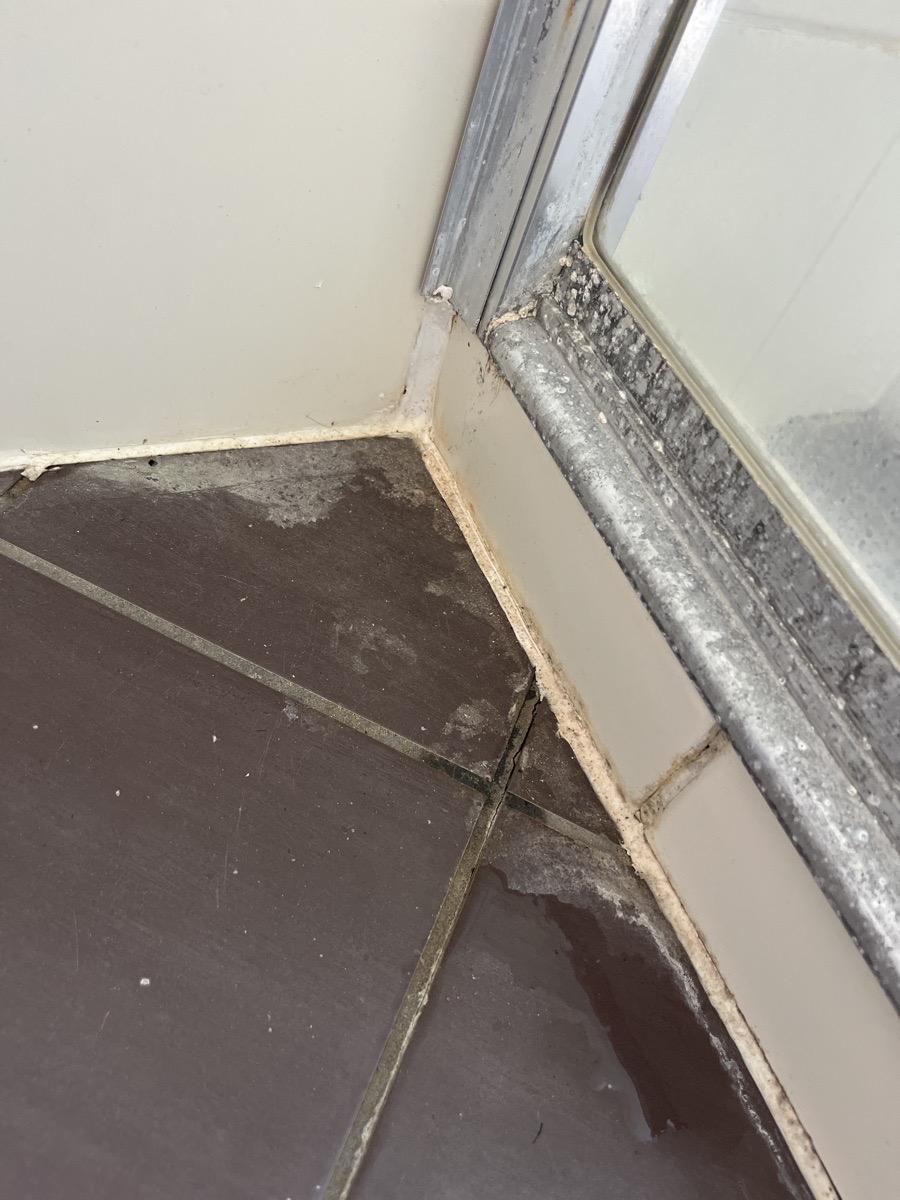
Black mould throughout | Deep mould infestation | High |
Efflorescence (white powder) | Water movement through grout | High |
Grout is disintegrating at the corners | Silicone failure likely too | High |
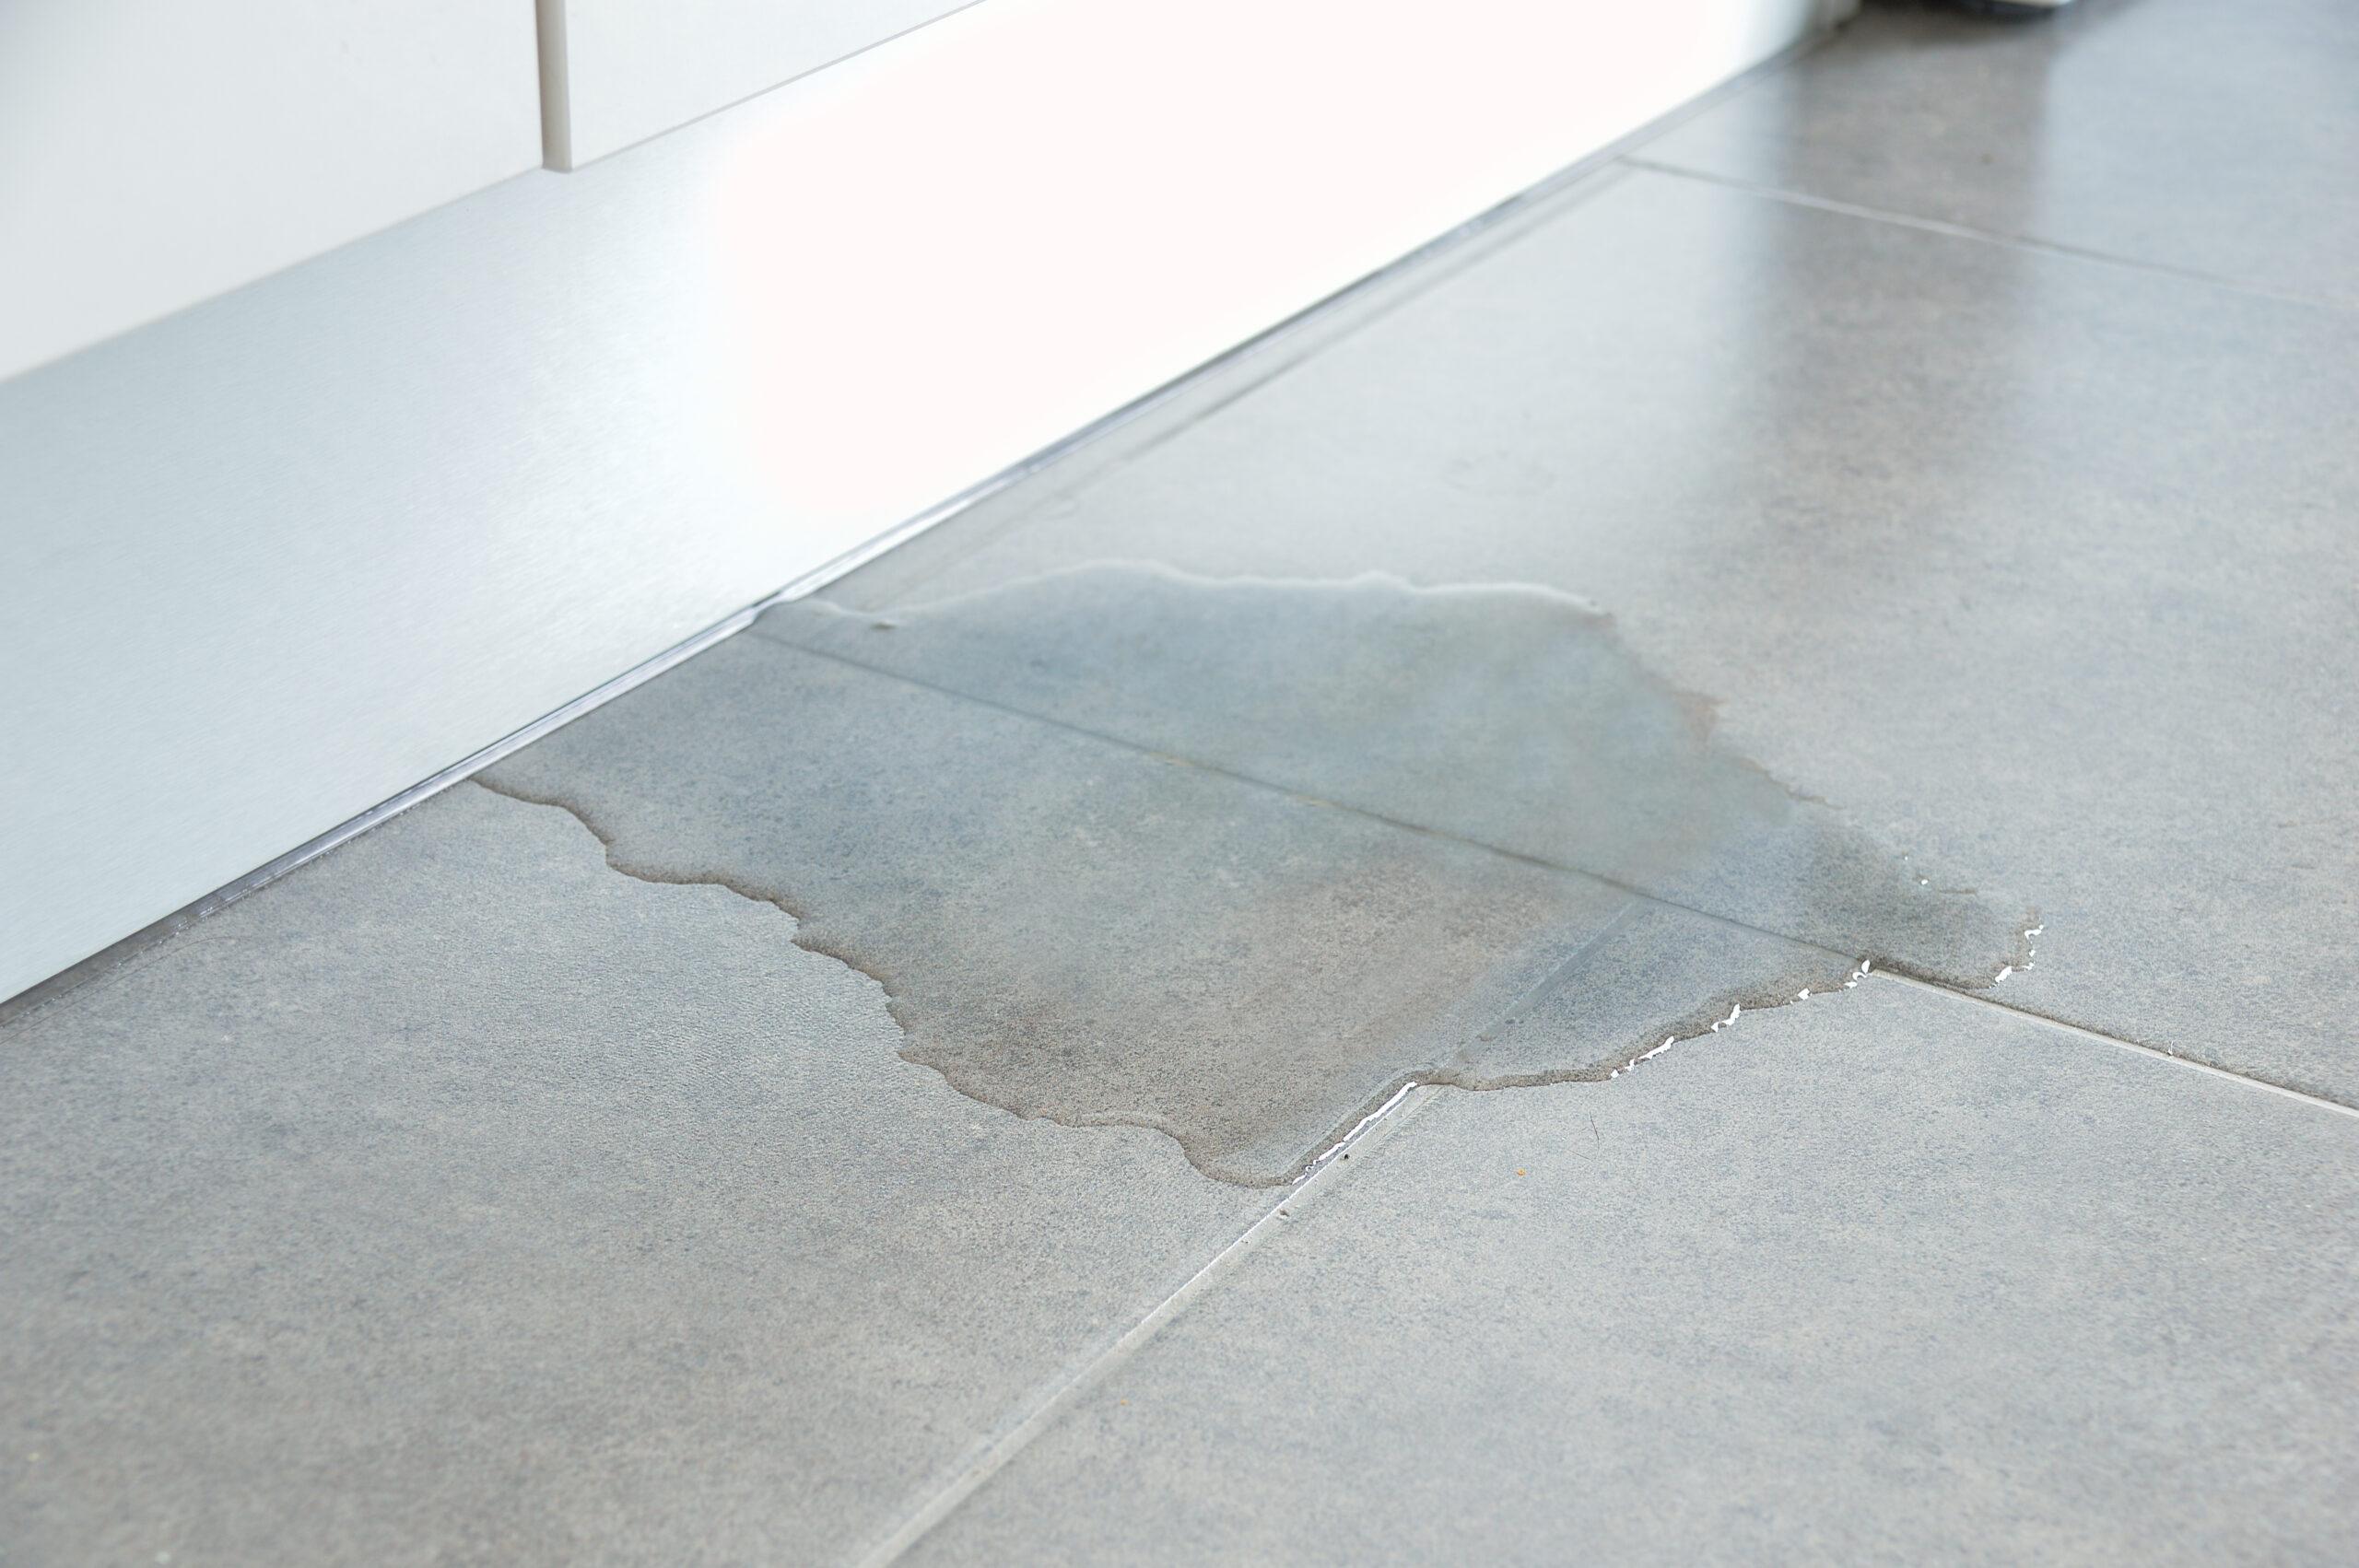
Water enters through the gap. The wall or floor substrate behind the tiles absorbs moisture. Over time, the waterproofing membrane behind the tiles can soften, crack, or fail entirely. Once that membrane fails, water reaches the structural framework of your bathroom. Timber framing rots. Concrete slabs can develop moisture issues. You end up with a repair that is no longer about grout at all. It becomes a full bathroom renovation.
In Australia, a basic grout repair costs a fraction of what a membrane-failure repair costs. Addressing grout damage early is the most cost-effective decision you can make for your bathroom.
Is your shower grout already showing signs of cracking or mould? Getting a professional assessment costs nothing and could save you thousands in structural repairs down the track.
Shower grout is exposed to moisture, heat, and daily use, which can wear it down over time. When it starts to crack or deteriorate, it usually signals deeper underlying issues, not just normal aging.
When grout is mixed too wet, applied unevenly, or allowed to dry too quickly, it never cures correctly. Poorly installed grout develops pinhole voids and weak points that begin to fail within a few years. This is one of the most common causes of grout problems in homes built during the construction booms of the 1990s and 2000s.
All buildings move slightly over time. Foundations settle, timber frames expand and contract with temperature changes, and concrete slabs shift. These micro-movements transfer stress to rigid grout lines, causing cracks. This is particularly common in corners and along the base of the shower where the wall meets the floor, which is why silicone is used in those joints rather than grout.
Grout is porous and stays damp in a shower environment. Without a quality sealer applied and maintained, it absorbs moisture and becomes an ideal environment for mould. Once mould colonises the grout, it physically breaks down the material from within while also staining it. Surface cleaning removes the visible mould but not the root structure embedded in the grout.
Bathrooms with poor ventilation stay humid long after the shower is used. This prolonged moisture exposure accelerates every form of grout deterioration. If your exhaust fan is weak or absent, grout problems will recur faster, regardless of how good the repair work is.
Acidic cleaners, bleach-based products, and abrasive scrubbing all degrade grout over time. Many common bathroom cleaning sprays are too aggressive for regular use on grout. They strip away the sealer and begin to break down the grout surface itself.
Cement-based grout has a functional lifespan. Even with good sealing and maintenance, most cement grout in a shower needs attention after eight to twelve years. Epoxy grout lasts significantly longer, typically fifteen to twenty years or more, which is one reason it has grown in popularity for shower applications.
This is a question many homeowners get wrong. Not every grout problem requires full shower regrouting, and conversely, patching over severely damaged grout is a waste of time and money.

Spot repair is appropriate when damage is confined to a small area, typically less than 20 percent of the shower grout lines. If you have one or two cracked sections, a small missing patch, or isolated mould spots with otherwise solid grout, targeted repair is the right approach.
Full regrouting is necessary when:
Grout pens and colouring products are purely cosmetic. They cover staining and restore the colour of the grout lines without addressing the underlying material. They are useful for freshening up grout that is structurally sound but discoloured from age or staining. They are not a substitute for repair or regrouting.
Getting the right tools before you start saves time and prevents tile damage. Here is what you need for a standard DIY shower grout repair.
Tool | Purpose |
Grout saw or oscillating multi-tool with grout blade | Removing old grout |
Grout float | Applying new grout |
Bucket | Mixing grout |
Sponge and clean cloths | Wiping excess grout |
Stiff brush | Cleaning grout lines |
Caulking gun | Applying silicone |
Safety glasses, dust mask, gloves | Personal protection |
Vacuum or stiff brush | Clearing dust and debris |
Material | Notes |
New grout | Epoxy- or cement-based, depending on application |
Grout sealer | Applied after the grout cures |
Silicone sealant | For corners and movement joints |
Mould treatment solution | If mould is present |
Masking tape | Protecting adjacent surfaces |
Drop sheets | Protecting the drain and flooring |
Cement-based grout is the traditional option. It is more affordable, widely available, and easy to apply. It requires sealing after application and resealing every one to two years to maintain its water resistance. Left unsealed, it absorbs moisture and becomes susceptible to mould.
Epoxy grout is a two-component system that creates an extremely hard, non-porous, chemically resistant surface when cured. It does not need sealing. It is highly resistant to staining, mould, and moisture. It lasts significantly longer than cement grout in shower environments. The trade-off is cost: epoxy grout is more expensive, and it is harder to work with because it sets quickly and is unforgiving during application.
For shower floors and high-use shower areas, epoxy grout is the better long-term investment. For smaller repairs on walls where moisture exposure is lower, cement-based grout with proper sealing performs well.
Learn about epoxy grout vs. cement grout for tiling.
This is the core process for a full DIY shower grout repair. Read through every step before starting so you understand the sequence and timing involved.
Inspect every grout line carefully. Note which sections are cracked, missing, soft, or mouldy. If there are any loose tiles, you need to address those first before regrouting. Protect the shower drain with tape or a cloth to stop grout debris from washing into the pipes. Lay drop sheets over the shower base if you are working on the walls.
This is the most labour-intensive part of the job. Use a grout saw for manual removal in small areas. For larger areas or very hard grout, an oscillating multi-tool fitted with a grout removal blade is much faster.
The goal is to remove grout to a depth of at least two to three millimetres. You do not need to remove every trace of grout, but you need to go deep enough to give the new grout a proper anchor point. Work carefully along the tile edges. Chipping a tile during this step is easy and frustrating.
For epoxy grout, removal is significantly harder because the material is much denser. A diamond-tipped grout removal blade makes the job manageable.
After removal, use a stiff brush and vacuum to clear every joint of dust and loose material. Any debris left in the joints will compromise adhesion.
If there is mould present, applying new grout over it without treatment is one of the most common mistakes in DIY shower repair. The mould will grow through the new grout. Apply a mould kill product to the cleaned joints and allow it to work according to the product instructions. If the mould is extensive, consider a steam treatment as well. Allow the joints to dry completely after treatment before proceeding.
Follow the manufacturer’s mixing instructions precisely. The consistency of the mixed grout should be similar to thick peanut butter, smooth and spreadable, but holding its shape without slumping.
If you are using epoxy grout, mix in small batches because it begins to harden quickly. You typically have around fifteen to twenty minutes of working time per batch. Do not mix more than you can apply in that window.
Load the grout float with fresh grout and hold it at approximately 45 degrees to the tile surface. Press the grout firmly into the joints, working diagonally across the tile faces so the material is packed into the joints rather than across them.
Work in manageable sections of around half a square metre at a time. This keeps the grout from drying before you can clean it. After you have pressed grout into all the joints in a section, drag the float across the tile surface at a sharper angle to remove most of the excess.
Dampen a sponge and wring it out so it is moist but not dripping. Wipe the tile faces in a circular motion to remove grout residue. Rinse the sponge frequently and change your water when it becomes milky. Avoid pressing too hard on the joints, as the grout is still soft. After the initial wipe, allow the grout to firm up for another thirty to sixty minutes, then do a final wipe with a clean, dry cloth to remove the grout haze that forms on the tile surface.
Corners at the base of the shower, where the wall meets the floor, and where the shower screen frame meets the tiles, are movement joints. These areas should never be filled with grout. Grout cannot flex and will crack in these locations every time.
Remove any old silicone with a utility knife and silicone-removing product. Clean the surface thoroughly and allow it to dry. Apply a bead of sanitary silicone sealant rated for shower use. Smooth it with a wet finger or a silicone tool and remove the masking tape before applying the silicone skins over.
For cement-based grout, allow 24 to 48 hours of drying time before lightly wetting the shower. Full cure takes several days. Do not use the shower for at least 24 hours after grouting. For epoxy grout, follow the specific manufacturer’s cure recommendations, which typically range from 24 to 72 hours.
Once the grout has fully cured, apply a penetrating grout sealer. This is a critical step that many DIYers skip, and skipping it means the grout will absorb moisture and stain within a short time. Apply the sealer with a small brush or applicator bottle, working it along each grout line. Allow it to penetrate for the time specified on the product, then wipe away any excess from the tile surface before it dries. Allow the sealer to cure fully before using the shower.
After the grout and sealer have cured completely, plug the shower drain and fill the base with water. Allow it to sit for 20 to 30 minutes, then check carefully around the shower frame, at the base of the walls, and anywhere there is a movement joint. A good repair should show no signs of a leaking shower.
Shower floor tiles present a slightly different set of challenges compared to wall tiles. The floor receives direct foot traffic, standing water pools on it, and the fall toward the drain means water pressure concentrates at certain points. Here is what to approach differently. Grout selection matters for the floor. For floor tile joints wider than 3mm, use sanded grout, which has better compressive strength. For narrow joints, unsanded grout is appropriate. Epoxy grout is particularly well-suited to shower floors because of its durability under foot traffic and constant water exposure.
Cleaning before regrouting is critical on floors. Soap scum, body oils, and general grime accumulate in floor grout more than anywhere else in the shower. Clean thoroughly with a degreasing product and scrub the joints well before removal begins. Residue left in the joints affects the bond of the new grout. The drain surrounds need particular care. The grout immediately around the shower drain is exposed to the highest concentration of water flow and is often the first to fail. Take extra care to fully remove old material here and pack new grout firmly.
Sealing is non-negotiable on shower floors. Floor grout takes more punishment than wall grout. Apply two coats of sealer when the grout has cured, and plan to reseal annually.
Cost is one of the first things Australians want to know before deciding between DIY and professional shower grout repairs. The answer varies depending on shower size, the extent of damage, the type of grout used, and your location.
Item | Approximate Cost |
Grout removal tool (manual) | $15 to $30 |
Oscillating multi-tool with grout blade | $80 to $200 (reusable) |
Cement-based grout (1 kg bag) | $10 to $20 |
Epoxy grout kit | $40 to $100 |
Grout sealer | $20 to $50 |
Sanitary silicone sealant | $10 to $20 |
Grout float and applicator tools | $15 to $30 |
Total DIY range | $80 to $250 |
Job Scope | Approximate Cost |
Small repair (spot regrouting) | $150 to $400 |
Standard shower full regrouting | $400 to $800 |
Large shower or full bathroom regrouting | $800 to $1,500+ |
Regrout with mould treatment | Add $100 to $300 |
Epoxy grout upgrade | Add $150 to $400 |
Grout sealing service only | $100 to $250 |
Note: Prices are general estimates for Australian metro areas as of 2026. Final costs vary by state, shower condition, and service provider.
For a straightforward repair where the tile structure is sound, the damage is limited, and you have a full day available, DIY is a reasonable choice. The tools are affordable, and the materials are available at hardware stores nationwide.
For larger jobs, jobs involving epoxy grout, situations with underlying tiling and waterproofing concerns, or anywhere you need a guaranteed watertight result, professional work is worth the investment. Poorly executed grout repair can trap moisture and cause more damage than the original problem.
There are situations where DIY is the wrong call. Knowing the difference protects you from expensive consequences.
Water is appearing outside the shower, such as under a nearby wall, in an adjacent room, or on the ceiling below the bathroom. This points to a waterproofing failure, not just grout failure.
Tiles are loose or hollow-sounding when tapped. Loose tiles mean the adhesive behind them has failed, often because water has been behind the tiles for some time. Re-grouting without fixing the tiles first is pointless.
Mould is coming back very quickly after cleaning. If mould reappears within a few weeks of cleaning, it has colonised the substrate behind the tiles, not just the grout. The grout is failing across the entire shower, and the installation is older than 10 to 15 years. At this point, a full regrout with professional-grade products, including new waterproofing membrane work, might be the correct solution.
You do not have the time or confidence to do the job properly. An incomplete or poorly executed DIY grout repair can cause more damage than the original problem if it traps water or creates new weak points.
Is your shower showing more than just surface grout wear? A proper inspection by a qualified tiler or shower restoration specialist can tell you exactly what the situation is before you invest money in repairs.
Even with the right materials, certain errors in the process will cause the repair to fail within months. These are the mistakes that come up most often.
Good grout repair is an investment. The way you maintain the shower afterwards determines how long that investment lasts.
Grout Type | Recommended Resealing Frequency |
Standard cement-based grout | Every 12 to 18 months |
Premium cement grout with an additive | Every 18 to 24 months |
Epoxy grout | Sealing is not required |
The choice comes down to joint width. Unsanded grout is appropriate for joints up to 3 millimetres wide. It is smooth in texture, flows into narrow joints easily, and does not scratch polished tile surfaces. It is the standard choice for most wall tile applications.
Sanded grout contains fine sand particles and is used for joints wider than 3 millimetres. The sand gives the grout additional bulk and compressive strength, which prevents it from shrinking and cracking in wider joints. It is commonly used on floor tiles and for stone tiles where the joints are wider.
Using sanded grout in narrow joints causes adhesion problems. Using unsanded grout in wide joints results in cracking and shrinkage. Matching the grout type to the joint width is one of the simplest ways to ensure your repair holds.
Match as closely as possible when doing a spot repair. Take a grout sample to the hardware store and compare it against available colours under natural light. Grout colours dry slightly lighter than they appear when wet, so factor that in.
White or very light grout in a shower is a maintenance choice as much as an aesthetic one. Light grout shows staining more readily and requires more frequent cleaning and resealing.
Mid-tone and charcoal grout are increasingly popular in Australian bathrooms because it conceals staining better and age more gracefully in a shower environment. From a practical standpoint, darker grout is lower maintenance in high-use showers.
Grout colouring products can change the colour of existing grout that is structurally sound. These penetrate the grout surface and tint it permanently. They are a useful option if you want to change the appearance without a full regrout.
Shower grout repair is one of the most important pieces of bathroom maintenance you can do as a homeowner. A small investment in time and materials today prevents significant water damage and costly structural repairs later. The process is clear and achievable for most people with basic tools and a weekend to spare
The key decisions are identifying the right type of repair (spot repair or full regrout), choosing the right grout for the application (cement-based or epoxy), treating any mould before applying new material, sealing the finished work, and maintaining it properly going forward.
When the damage is extensive, tiles are loose, or water has been getting behind the wall, the right decision is to bring in a professional. Hiring qualified tilers and shower restoration specialists can assess the full picture, identify any underlying problems, and deliver a sealed, watertight result with lasting warranty coverage.
Whether you take the DIY approach or hand it over to a professional, the important thing is not to leave damaged shower grout unattended. The water does not wait.
Silicone can temporarily seal small cracks and slow water ingress in an emergency. It is not a proper repair. Silicone over grout does not adhere well to all surfaces, can trap moisture underneath it, and masks the underlying problem without solving it. For a lasting result, remove the cracked grout and apply new material correctly.
Cement-based shower grout typically lasts eight to sixteen years with regular maintenance and annual resealing. Epoxy grout can last twenty years or more. Poor installation, inadequate sealing, harsh cleaning products, and high humidity all shorten the lifespan. Annual inspections and prompt action on any signs of deterioration extend grout life significantly.
A standard shower typically takes four to eight hours of active work for grout removal, cleaning, and new grout application. Add another 24 to 48 hours of curing time before the shower can be used. A full regrout of a large shower with extensive mould treatment may take the better part of a day or require two sessions.
Several products are marketed as grout-over-grout solutions, but they produce significantly inferior results compared to proper grout removal and replacement. They are appropriate only as a short-term cosmetic treatment, not a structural repair.
A penetrating silicone sealer or impregnating sealer specifically rated for wet areas is the best choice for shower grout. These products soak into the grout and create a hydrophobic barrier without sitting on the surface, where they can peel. Look for products labelled as appropriate for wet areas and follow the manufacturer’s reapplication schedule.
Drop a few drops of water onto the grout. If the water beads and sits on the surface, the sealer is still active. If the water soaks in and darkens the grout within a few seconds, the sealer has worn away and needs to be reapplied.
Yes, a standard shower regrout is a manageable DIY project for someone with patience and basic tool skills. The most important requirements are proper grout removal, thorough surface preparation, the right grout for the application, and sealing the finished work. The steps are not technically complex, but they require attention to detail and appropriate time allocation.
Grout at corners and joints where two planes meet (wall to wall, wall to floor) is subject to movement stress that the rigid grout material cannot absorb. These joints are known as movement joints and should always be filled with silicone sealant, not grout. Silicone can flex with movement without cracking. Any grout in these positions will crack regardless of how good the application is.
A grout problem is visible: you can see cracks, gaps, or mould in the grout lines. A waterproofing problem usually shows up as dampness or staining outside the shower itself, such as on a wall beside the shower, on the floor near the base of the enclosure, or on a ceiling in a room below. If you notice any of these signs, the issue is likely not just the grout.
Regrouting is always the first option if the tiles themselves are in good condition. Tile replacement is only necessary if the tiles are cracked, loose due to adhesive failure, or the waterproofing behind them has failed and needs to be fully reinstated.
It is not recommended. New grout over old does not bond properly and tends to crack or fall away within a short time. Removing the old grout to an adequate depth before applying new material gives a far more durable result.
A professionally executed regrout using quality materials and proper sealing should last eight to fifteen years for cement grout and significantly longer for epoxy. With good maintenance and periodic resealing, it can last well beyond that.
Regrouting addresses grout-related water ingress. If the shower is leaking due to a failed waterproofing membrane behind the tiles, regrouting alone will not fix the leak. A professional inspection is needed to determine the cause before committing to any repair work.
Water continues to enter through the damaged area. Over time, this causes the adhesive behind tiles to fail, tiles to loosen, and the waterproofing membrane to deteriorate. Eventually, the substrate itself becomes damaged, turning what was a simple grout job into an expensive bathroom restoration.