Key Takeaways
Grout fails silently. Then, one morning, you notice a dark stain spreading behind your tiles, a crack running the full length of your shower wall, or a faint smell that no scrubbing can shift. By the time most homeowners act, the grout has already been failing for months, sometimes years.
This guide gives you everything you need: the signs to look for, the exact steps to follow, real Australian pricing, and honest advice on when DIY is enough and when a professional like Aquatech Grouting is the smarter call.
Grout is not just the filler between your tiles. It is a structural material that keeps moisture out of your walls and floors, maintains tile alignment, and forms the first line of defense against the kind of water damage that can rot a wall frame from the inside over time.
When grout deteriorates through age, movement, poor installation, or ongoing moisture exposure. It stops doing its job. Water finds those tiny pathways, seeps behind the tiles, and begins attacking the substrate underneath. By the time you see a bulge in the wall or feel a hollow tile underfoot, the damage has already spread well beyond what was visible at the grout line.
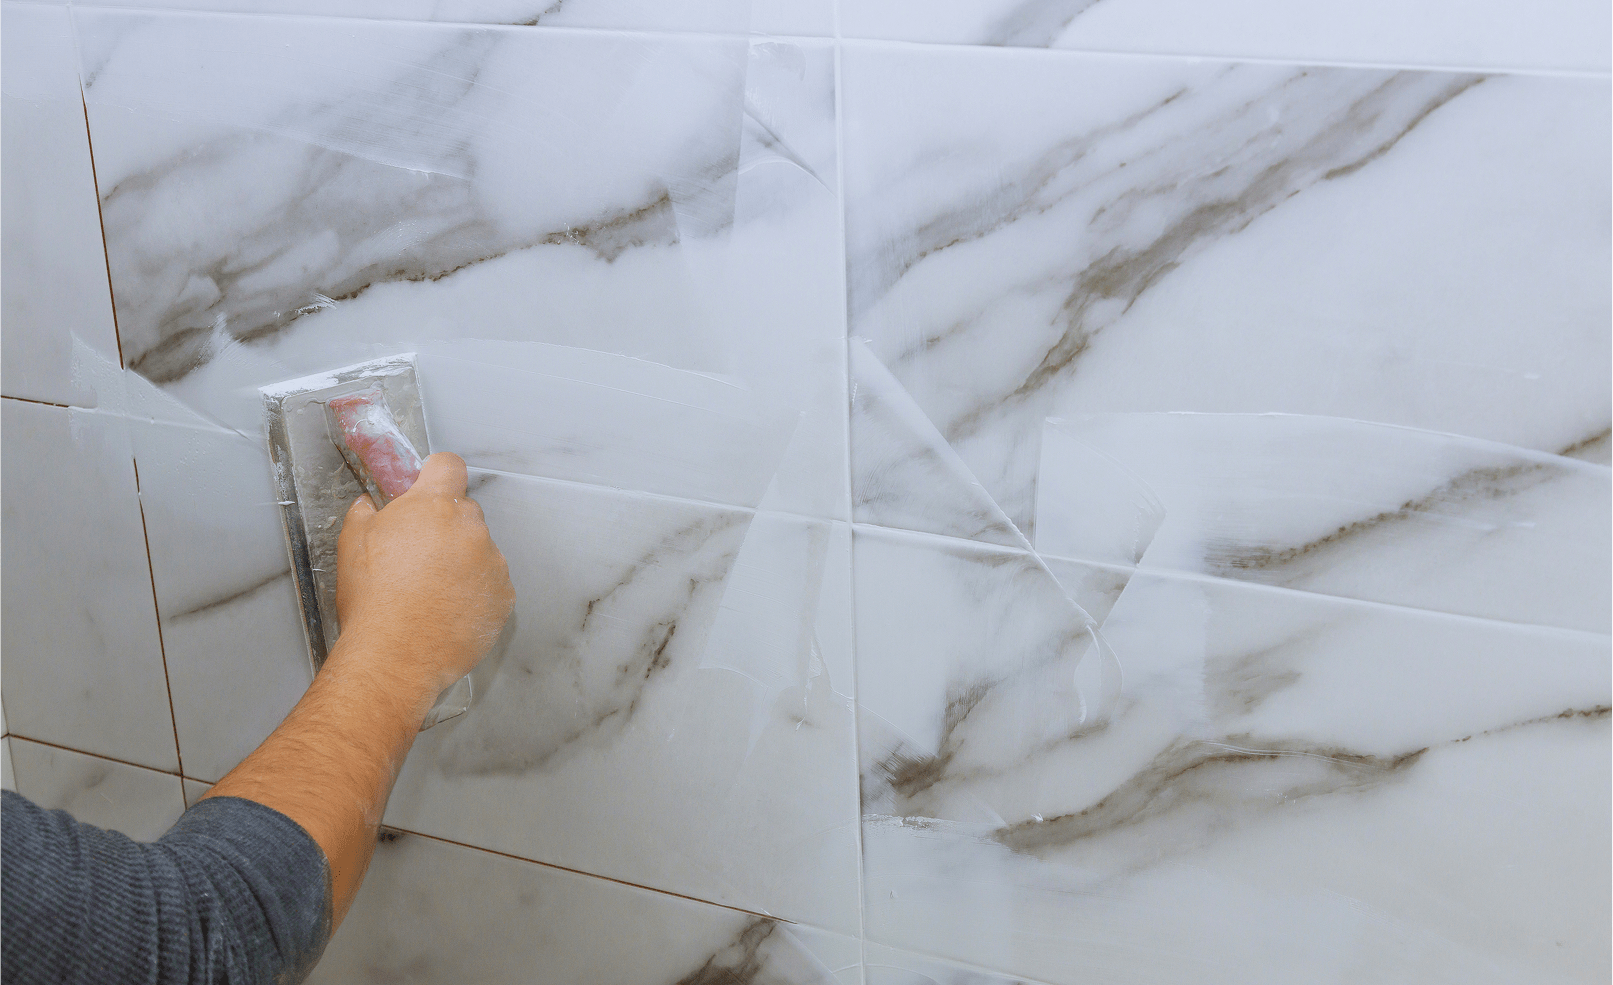
Regrouting means removing that degraded grout right back to a solid base, treating any underlying mould or surface issues, and installing fresh grout that seals the shower correctly again.
Regrouting is not cosmetic. It is structural maintenance. A fresh grout line does look better, but the real value is the water barrier you are restoring.
Run through this checklist before deciding your next step. The more boxes you tick, the more urgent your regrouting needs are.

Shower Regrouting Sign | What does it mean? | Urgency |
Grout lines are grey, brown, or permanently stained | Surface degradation, possible mould | Moderate |
Grout is cracking or crumbling in sections | Structural failure beginning | High |
Black mould is visible in grout joints | Mould penetration may be deeper than it looks | High |
Tiles feel hollow or shift when pressed | Water has reached the adhesive layer | Very High |
Grout is missing in sections | Full water exposure of the substrate | Critical |
The shower smells musty even after cleaning | Mould behind tiles | Very High |
You cannot remember the last time it was sealed | Overdue for maintenance | Moderate |
Grout is more than 10–12 years old | Nearing the end of service life | Moderate |
Are you unsure whether the problem goes deeper than grout? Read our guide on how to tell if your waterproofing has failed before you start any DIY work.
There is no single answer. It depends on the original grout quality, how often the shower is used, whether it was properly sealed, and your bathroom’s ventilation.
As a general guide:
Annual sealing extends grout life significantly. Most Australian homeowners skip this step entirely, which is one of the main reasons grout fails earlier than it should.
Deteriorating grout does not stay at the grout line. Water moves through concrete substrate, timber framing, and insulation without any visible indication until the damage is severe. In practice, neglecting shower regrouting for long enough leads to:
If you notice any of these warning signs, your shower may already need leak repairs, not just regrouting. Fixing the problem early will always cost far less than waiting until the damage gets worse.
Yes, and the numbers back this up clearly.
Option | Average Cost (AU) | What Do You Get? |
DIY regrouting | $70–$220 | Restored waterproof seal, fresh appearance |
Professional regrouting | $250–$1,200 | Guaranteed workmanship, warranty-backed result |
Partial shower rebuild | $2,000–$5,000 | Required if water damage has spread to the substrate |
Full shower replacement | $5,000–$15,000+ | Required if tiles, framing, and waterproofing all need replacing |
Regrouting is always the cheapest intervention available. It is most cost-effective when done proactively before water damage reaches the substrate.
Australian regrouting costs differ from US or UK figures because of local labour rates, product availability, and whether you are in a metro or regional area.
Item | Estimated Cost (AUD) |
Grout (Davco Sanitized, Mapei, or Ardex) | $15–$45 |
Oscillating multitool (if you don’t own one) | $60–$180 |
Manual grout saw (budget option) | $15–$35 |
Grout float | $12–$28 |
Grout sponge | $8–$15 |
Grout sealer | $18–$40 |
Tile cleaner/surface prep | $10–$20 |
Safety goggles and gloves | $10–$20 |
Total (DIY materials) | $70–$220 (without power tool) |
Total (DIY with oscillating tool) | $130–$380 |
Tip: If you are only regrouting once, hiring an oscillating tool from Kennards or Coates is more economical than buying. Hire costs typically run $30–$60 per day.
Regrouting Shower Size | Estimated Professional Cost (AUD) |
Small (900 × 900 mm) | $250–$450 |
Standard (1,200 × 900 mm) | $400–$650 |
Large (1,500 × 1,000 mm or walk-in) | $600–$1,000 |
Full bathroom (shower + floor tiles) | $900–$1,800+ |
Labour accounts for 60-80% of the total professional regrouting cost. A qualified tiler and regrouting specialist typically charges between $65-$120 per hour in Brisbane and South East Queensland.
What increases cost:
What reduces cost:
Hidden Cost | When Does It Apply? | Estimate (AUD) |
Anti-mould treatment | Visible or suspected mould in grout | $50–$150 |
Silicone replacement at corners and junctions | Almost always needed alongside regrouting | $100–$250 |
Waterproofing membrane repair | If water has reached the substrate | $300–$800 |
Tile replacement (cracked or hollow tiles) | Tiles need to be removed to assess the substrate | $150–$400 per tile area |
Silicone at corners and floor-to-wall junctions should always be replaced at the same time as regrouting. These movement joints are silicone, not grout, according to building code, and using grout here causes cracking within months.
Regrouting your shower yourself can save money upfront, but it requires time, skill, and the right tools to avoid mistakes. Hiring a professional costs more initially, but ensures a longer-lasting, high-quality result. Understanding the differences will help you choose the best option for your budget and situation.
Factors | DIY | Professional ( Aquatech Grouting) |
Upfront cost | $70-$380 | $250-$1,200+ |
Time required | 2-3 days | 4-8 hours (one visit) |
Skill level needed | Moderate | Expert |
Tools required | Must buy or hire | Provided |
Finish quality | Variable (depends on your skill) | Consistent, professional |
Mould assessment | You carry the risk | Professionally assessed |
Warranty | None | Typically 1-3 years or more |
Waterproofing compliance | Unknown | Certified to AS 3740 |
Correct grout selection | Your responsibility | Expert recommendation |
For a thorough introduction to the DIY process before you start, see our step-by-step guide on: How to Grout Tiles: DIY Tips, Mistakes, and Tools
For Brisbane homeowners, Aquatech Grouting offers free quotes and assessments. They can tell you exactly what level of work is needed before you commit to anything.
Not all tradies offering regrouting are equally qualified. In a waterproofed wet area, the work must meet Australian Standard AS 3740. Here is what to check before signing a quote:
Grout selection matters more than most DIY guides acknowledge. The wrong grout in a shower either cracks, discolours early, or allows moisture penetration, undoing the whole regrouting project within a year or two.
Grout Type | Best Use Case | Needs Sealing? | Cost (AUD/kg) |
Sanded cement grout | Floor tiles, grout joints wider than 3mm | Yes | $8–$18 |
Unsanded cement grout | Wall tiles, joints narrower than 3mm | Yes | $10–$20 |
Polymer-modified cement grout | High-movement areas, underfloor heating | Yes | $15–$30 |
Epoxy grout | Wet areas, commercial, zero-maintenance | No | $40–$90 |
Furan resin grout | Industrial/chemical resistance (rarely residential) | No | Specialist |
For most Australian shower regrouting projects, the choice is between cement grout and epoxy grout. Before making that decision, read our detailed breakdown: epoxy vs cement grout: why the right choice matters for waterproofing.
Aquatech Grouting uses durable epoxy grout as standard because it performs better in Queensland’s humid climate and does not require ongoing maintenance or sealing.
Brand | Product | Where to Buy | Best For |
Davco | Sanitized Grout | Bunnings | DIY wall tiles, light use |
Mapei | Ultracolor Plus FA | Trade suppliers | Premium DIY and professional |
Ardex | FL / FG8 | Trade suppliers | Floor specialist |
Dunlop | Pro-Grout | Bunnings | Budget DIY |
Sika | SikaCeram CleanGrout | Trade suppliers | Epoxy, professional use |
Is your tile joint wider than 3 mm?
Do you have glass or polished stone tiles?
Do you want zero-maintenance grout that never needs sealing?
Grout colour affects how your shower ages and how much maintenance it demands.
Tip: If you are regrouting to match existing grout, take a small sample (chip one loose piece) to your tile supplier or use a grout colour chart. Getting the shade wrong is a common and frustrating DIY mistake.
Tool | Purpose | Bunnings Approx Price | DIY-Friendly? |
Oscillating multitool + grout blade | Fast, accurate grout removal | $80–$180 (buy) / $30/day (hire) | Yes |
Manual grout saw | | Budget grout removal (small areas) | $15–$35 | Yes |
Grout float (rubber-faced) | Applying new grout | $15–$28 | Yes |
Margin trowel | Mixing and scooping grout | $12–$20 | Yes |
Grout sponge | Cleanup, shaping joints | $8–$15 | Yes |
Shop vac/dustpan | Removing grout dust | Owned or $2/day hire | Yes |
Bucket (2x) | Mixing and rinsing water | $5–$12 | Yes |
Grout shaper/jointing tool | Professional-looking joint finish | $8–$18 | Yes |
Grout sealer + applicator brush | Post-cure waterproofing | $18–$40 | Yes |
Safety goggles and a dust mask | Protection during removal | $10–$20 | Yes |
Anti-mould spray (Selleys No More Mould) | Pre-treatment | $8–$15 | Yes |
Painter’s tape | Protecting screens and fittings | $6–$12 | Yes |
Before any grout is touched, set up properly.
This is the most time-intensive step and the one most DIYers underestimate.
With an Oscillating Multitool (Recommended)
With a Manual Grout Saw
Important Rules During Removal
New grout cannot bond to dust, mould residue, or old cleaning products. This step is not optional.
Correct grout consistency is one of the most important factors in a successful result.
Timing matters here. Begin cleanup approximately 15–30 minutes after applying grout, when the grout surface has just begun to firm up but is not yet hard.
Shower Corners and Floor-to-Wall Junctions’
Do not use grout here. Australian Standard AS 3740 requires that movement joints at internal corners and floor-to-wall junctions be filled with flexible silicone sealant, not grout. Grout in these locations will crack within months due to the natural flex between two perpendicular surfaces. To correctly finish these joints:
Regrouting Around Shower Drains
The drain collar area requires particular attention:
Recessed Niches and Shelves
Curing Your New Grout
Applying Grout Sealer
Note: Epoxy grout does not require sealing. Its non-porous nature is one of its key advantages over cement grout.
Not all parts of your shower are the same, and some spots need a little extra attention. Corners, edges, and areas that get the most water can require slightly different techniques to make sure everything looks smooth and stays properly sealed.
Floor tiles present different challenges to wall tiles:
Corner joints and floor-to-wall junctions must always be silicone, not grout. If you are regrouting these areas, remove the old silicone completely first, clean the substrate, and then apply fresh bathroom-grade silicone after the rest of the regrouting is complete and cured.
Shower trays (pre-formed resin or acrylic bases) have a different consideration: grout should not be used at the junction between the tray and the wall tiles. This junction should always be silicone.
This is one of the most commonly asked questions in regrouting and one of the most reliably misunderstood. The short answer is not proper and not long-term.
Here is why: grout bonds to two surfaces, the side faces of adjacent tiles. When you apply new grout over old grout, the new material can only bond to the surface of the old grout, not to the tile faces. This creates a shallow bond with minimal mechanical grip. New grout is applied over old grout, typically:
When is it acceptable?
If existing grout is structurally sound and well-bonded, and you are applying a grout refresher product (designed specifically for colour restoration over existing grout), this can be a short-term cosmetic fix. Grout refreshers (such as Grout Pen or Grout Boost Restorer) recolor and seal the surface without structural bonding. They typically last 2–4 years in a shower environment.
The only proper fix is full grout removal and replacement. Any other approach is cosmetic.
Regrouting a shower might seem straightforward, but a few common mistakes can lead to messy results or grout that doesn’t last. From not fully removing old grout to rushing the curing process, knowing what to avoid can save you time, effort, and costly repairs later on.
Mistake | Why Does It Fail? | What to Do Instead? |
Not removing enough old grout | New grout bonds superficially and cracks early | Remove a minimum of 5mm depth |
Skipping surface drying | Moisture prevents proper grout hydration and bonding | Dry 12–24 hours before applying |
Mixing too much grout at once | Grout hardens mid-project | Mix in small batches (30-min quantities) |
Using too much water in the cleanup | Dilutes grout, weakens bonds, causes discolouration | Sponge wrung almost dry |
Using grout in corners and junctions | Cracks within months due to movement | Silicone in all internal corners |
Skipping the sealant | Cement grout absorbs moisture and stains | Seal within 72 hours of curing |
Regrouting over wet or cold substrate | Chemical bond failure | 24h dry time, apply at 15–30°C |
Sanded grout on glass or polished stone | Permanent scratching of the tile surface | Unsanded grout only on these tiles |
Regrouting is the reset. Maintenance is what keeps the result lasting. Most shower grout fails earlier than it should because the maintenance schedule is either wrong or nonexistent.
Monthly, Quarterly, and Annual Grout Maintenance Schedule
Best Grout Maintenance Products Available in Australia
Avoid: Products containing bleach, ammonia, or high acidity (vinegar, lemon) used regularly on cement grout. These degrade the grout binder over time, causing premature crumbling.
Regrouting is one of the most cost-effective things you can do for your home. It costs a fraction of what bathroom damage costs to fix, it extends the life of your tiles, and it protects the structure of your shower for years to come.
That said, not every regrouting job is a straightforward DIY weekend project. The outcome depends heavily on the quality of the grout removal, the surface preparation, the grout selected, and how the corners, edges, and drains are handled. Get any of those wrong, and the result fails within months.
Here is a simple decision guide based on your shower situation and the best next step:
If you are in Brisbane, the Gold Coast, or the Sunshine Coast and your assessment points toward professional work, Aquatech Grouting is the team to call for shower regrouting in Brisbane.
Not effectively. New grout applied over existing grout only bonds to the surface of the old material, not to the tile faces. This creates a shallow, brittle joint that typically cracks within 6-12 months. Full grout removal is the only way to achieve a lasting result.
Yes, in most cases. A shower can be regrouted as long as the tiles themselves are sound, well-bonded, and the substrate behind them is dry and structurally intact. If tiles are hollow, loose, or if the substrate shows signs of water damage, a more significant repair may be required before regrouting.
Yes. Regrouting costs $250–$1,200 professionally, compared to $3,000–$15,000 for shower rebuilds driven by water damage that could have been prevented. It also improves hygiene, appearance, and the waterproof integrity of the shower.
Every 10–15 years for a well-maintained, sealed shower. Unsealed grout or a heavily used shower may need regrouting in 7–10 years. Annual inspection and regular sealing extend the intervals significantly.
Active work takes 4–7 hours spread across 2–3 days (allowing for surface drying and grout curing between sessions). A professional regrouting team can typically complete a standard shower in a single day.
Between $250 and $1,200, depending on shower size, tile type, grout type, and whether any additional treatment (mould remediation, silicone replacement) is required.
A small shower (approximately 900 × 900 mm) typically costs $250–$450 for professional regrouting. DIY material cost is $70–$150.
A small shower (approximately 900 × 900 mm) typically costs $250–$450 for professional regrouting. DIY material cost is $70–$150.
Yes, Spot regrouting of damaged sections is possible and much less expensive than a full shower regrout. However, matching existing grout colour is challenging, and if the surrounding grout is also nearing the end of its life, a full regrout delivers better long-term value.
It can, if failed grout is the primary cause of the leak. However, if water is getting past the grout into the substrate (evidenced by hollow tiles, soft surfaces, or visible damp patches on adjacent walls), regrouting alone will not resolve the underlying issue.
No. Allow a minimum of of 24 hours before light water exposure and 48–72 hours before full shower use. Using the shower too early washes uncured grout out of the joints and causes premature failure.
Yes, for cement-based grout. Apply a penetrating sealer after 72 hours of curing. Epoxy grout does not require sealing. It is non-porous by nature.